Tampilkan postingan dengan label anatomy. Tampilkan semua postingan

Rabu, 29 Januari 2014

Where Do Eggs Come From - How Chickens Create Eggs


Warning!
The following post contains graphic material.

Some time ago, we ran an article on this very subject, complete with artistic representations of the inner workings of a mature, laying hen. (Chickens, Eggs, Fertilization, Reproduction and Other Insider Information) Now, due to an unfortunate hawk attack, we can show you the real thing.
Read more »

Rabu, 12 Juni 2013

Tiny Heartbeat - Chicken Embryo at 48 Hours Incubation


By Justine -


At 48 hours into incubation, I candled my eggs to see if I could see veining for the first time... just out of curiosity, as they are my much anticipated Barred Plymouth Rocks. 

Unfortunately this egg was cracked in two places and leaking Albumen (egg white) - so I had to toss it. Before doing so, I thought it would be interesting to see what was going on at 48 hours.

If you look very closely, you can just make out the heart - still beating.

***
***

The heart continued to beat for roughly 5 minutes. I took this video after it had already started to slow. 

Justine

*

Jumat, 18 Januari 2013

Chickens, Eggs, Fertilization, Reproduction and Other Insider Information


One of my daughters has a Silkie that pops out eggs like a gumball machine! She layes almost daily... about every 25 hours. Ever wonder how chickens do that?


On this blog, it is not that uncommon for me to show the insides of real chickens. Happily, I can assure you that through the magic of electronics and art, my daughter's gumball machine Silkie (today's model of chicken reproduction) is running happily about the yard as I write.


So in this chicken version of How Stuff Works, I have made a rather simple diagram of the inner reproductive workings of the average hen. Chickens develop and hatch with thousands of ova (yolks or undeveloped eggs) - already inside their ovary. Though chickens start out (in the egg) with two ovaries, only the left one develops and becomes active. It is this way with almost all poultry, though raptors differ in that generally the right side develops and not the left.

In this diagram you can see Ova in various stages of development near the #1.

As a pullet matures, her reproductive organs mature also. From the outside we can usually see the growth and reddening of the comb and wattles... unless, that is, it is a Silkie where comb and wattles tend to be dark in color and hidden under tons of fluff.

When a mature Ovum is released from the Ovary, it is called ovulation. The entire reproductive system is called the Oviduct and  is usually between 25 and 27 inches long in a mature hen. The Oviduct has five distinctive parts. The first part is the Infundibulum - When the ovum is released from the ovary, the muscle lining of the infundibulum pulls the ovum into it... sort of like a mini egg vacuum. The ovum spends about 15 to 18 minutes in this part of the oviduct.

Fascinating fact - when a rooster mates with a hen, he mounts her and, standing on her back, lowers his cloaca (vent) and the hen inverts her own cloaca to meet with his. There is no penetration, but the sperm packet released by the male is taken into the hen's cloaca or vent. From there the sperm makes its way to the infundibulum where it awaits the release of an ovum. Sperm can live in the infundibulum for more than 2 weeks.

So - the ovum is released from the ovary into the 3 to 4 inch-long infundibulum where it is fertilized with the rooster's sperm if the hen has been mated.


 Then the fertilized (or unfertilized) ovum moves into the Magnum. The magnum is the longest section of the oviduct at roughly 13 inches in length (diagram is SO not to scale). This is where the egg white or Albumen is added to the ovum. The ovum's trip down the magnum takes about 3 hours.

 
Next, the partially-constructed egg moves into the 4 inch long Isthmus where the inner and outer shell membranes are added over a period of about 75 minutes.


The egg then moves into the Shell Gland (Uterus) where it stays for 20 hours to have its shell constructed. The hen's body will pull some calcium from her bones and the rest from her diet to put into the shell. If the hen is of a breed that lays colored eggs, the pigment will also be put into the egg in this section of the oviduct.


After the shell has been added, the egg moves down toward the Cloaca or Vent so that the chicken may lay the egg.


And from here the entire process starts over. Interesting facts to note, chickens almost never lay eggs after dark. It takes an average of 25 hours to form a new egg. This means that even the best layers will have to skip a day every now and then because her egg comes an hour later each day, and once she reaches point at dusk, her body will hold on to the egg until the next morning.

Often people wonder about pullets laying shell-less eggs or irregular eggs. The best way to explain this is that as a pullet matures, all those parts of the oviduct may not be ready to create an egg all at the same time. If the Shell Gland is not ready or hasn't been able to procure enough calcium from the hen's body or diet, it may not be able to form a shell properly. It is best not to eat shell-less eggs. Feed them to your chickens - they love eggs for breakfast!

Hens that seem to have a habit of laying eggs with ridged or rough shells likely have an abnormality in their Shell Gland. Generally it is harmless to the hen, and perfectly safe to eat eggs with ridged shells.


Sometimes small spots of blood or meaty substances are present in eggs. This is caused when some part of the oviduct sheds material or has a broken blood vessel, and the shed matter simply gets wrapped up inside the egg when the membranes or shell is added. Though it should be fine to eat such eggs (fully cooked), that is solely up to you.

It is also very common for pullets to have some funny issues with laying when they have just started, and it is also common for mature hens to have some issues when they re-start laying after being broody or after a molt.

Oh - and one last thing... while feces and eggs both exit through the Vent, the oviduct and the end of the large intestine open right before the inside of the vent opening. This is why it is very, very uncommon to have worms inside an egg... the oviduct is placed far from the intestinal tract where parasites live to  help prevent such things. People may mistake a bit of sloughed off oviduct lining for a parasite - - because any parasite that found its way into an egg would have had to take a seriously wrong turn somewhere along the way!! Of course, it is not impossible. If it truly is a parasite inside one of your hen's eggs, it could indicate an uncommonly high parasite load in that chicken, and it would be time to take action to remedy the situation.


Happy Laying!

*

Sabtu, 12 Januari 2013

Diary of a Sick Chicken and a Necropsy - Graphic!

Part of flock management is knowing your birds well enough to know when something is wrong. This week, one of my Lavender Orpington pullets (of about 22 weeks of age) became lethargic. She was not staying with the flock and she had a hunched up appearance.

Note how her neck was hunched back into her body.

One can see a difference in her posture in this photo taken prior to her becoming ill.

I brought her in and put her in a dog crate. Over a period of hours I could see that she that her stool was mostly urate - liquid with lots of white stuff - and there was very little solid matter at all. 

I felt about and her crop did not seem to be impacted. It felt the way it was supposed to feel, for the most part. I believed the issue could be an impacted or blocked gizzard.

I gave her warm olive oil mixed with yogurt, electrolytes, garlic and oregano orally with a syringe and soaked her in a warm bath to see if that would get things moving. She loved her warm bath (and a massage of the gizzard area) - and it seemed to help. There was more solid matter in her stools... for a little while.


Then everything stopped moving again. I did more oral treatments and another soak, but this time it didn't work. I could tell she was failing quickly, so I put the poor girl out of her misery.

I feel it is important to do what one can to find out the cause of an illness and why a bird in one's flock dies. If there is an illness or a parasite problem, it is important to find out so that one may protect or treat the rest of the flock to prevent further deaths.

I performed a necropsy on this bird. The following images are very graphic and meant for educational purposes. If you have a weak stomach,  
please stop reading now.

You have been warned...


OK - very first thing - we can see how thin this bird was. With all her winter fluff, it was not possible to see just how much weight she had lost, but I could feel it when I picked her up.

Secondly, look at her keel bone. This bone is supposed to be straight... not only is this pullet's keel bone not straight, but it is very, very crooked! So much so that had she not died at this early age, I feel this defect would have impacted the rest of her life negatively. (Legs are at the top of the photo, and neck at the bottom.)


We can also see the presence of material in her crop. Here is a diagram to reference as we go:


Upon opening her, it was instantly evident that something was blocked!


That giant, bulbous thing is her pancreas. Not a good thing to see! Digging further, I could see she was backed up at the point were her pancreas funneled into the small intestine. The blockage caused everything above it to become engorged.

Her gizzard was engorged, as was her proventriculus. The dark maroon mass is her liver.


And now the cause...

 This is the lower end of her pancreas. This piece that I cut off is where the problem was. Lumpy, tough growths that were blocking the flow of all but liquid matter.

So to illustrate the issue, I placed her internal organs in order from the neck (on the left) to the cloacia or vent, on the right. You can see that everything above the blockage is engorged, and everything below it is not.

A "flow chart," so to speak, indicating the direction food moves through the chicken.

While in many cases an impacted crop or gizzard can be corrected, in this case there was no way to save this particular chicken. She apparently was not put together very well to begin with, and would likely have died no matter what.

On the flip side, it is good to know that it was not something she ate that my other chickens might have gotten into also, and it was not a disease.


Sabtu, 22 Desember 2012

Guide to Feather Anatomy and Coloration


By: Karen - KI4GOT   (Visit Karen’s Farm Here)


I've seen a number of people who are new to poultry asking, "What is ______?" Fill in the blank with any color or feather type or part found on a chicken.  Hopefully this post will provide a good reference for all your future feather questions.

The FIRSTthing I will recommend, if you want to breed any American Poultry Association recognized varieties of poultry, is to get a copy of the Standard of Perfection (SOP). Any edition will do as many of the breeds haven't changed in years, though newer volumes will have more recently added breed varieties. You can order the most recent edition directly from the American Poultry Association by clicking here. Many breed association websites will also go into detail for the various recognized varieties.

I'm not going into great depth here, just covering some of the basics. If you want to know more, you have the greatest research tool at your fingertips. It's called the Internet. Google is your friend. If you want to know something, type in what you're looking for and you'll find way more than what you wanted to know. LOL

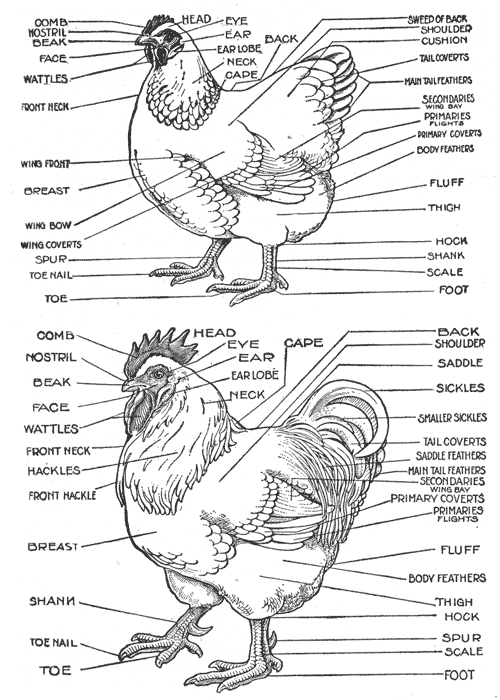
First, the general parts of a chicken. This part is easy. I found the following image at: http://files.backyardchickens.com/graphics/chickenparts.gifand it does a pretty good job of showing all the anatomical terminology. When reading the Standard of Perfection for any breed, it will give specific descriptions of the important areas for each breed, variety and gender -  if there are differences between them. Some varieties will be the same for both sexes and noted as such (for example, solid colored birds).


Next is a diagram showing the feather categories of a wing, found at http://theprophetandtheliar.tumblr.com/post/13458043137/chapter-03-animal-anatomy. This is a great place for some comparative anatomy between humans and some other animals, and I recommend it for anyone interested in knowing the similarities and differences. Some breeds will have color variations within these groups of feathers, so knowing which feathers you are looking for is important.

Now for the anatomy of a single feather.  I don't remember where the original version of this image came from, but it has been edited slightly with the more common names of the components.


And even more detail of a feather. All chickens have normally barbed feathers with the exception of Silkies. Silkies lack the barbules that hold the individual feather barbs together. When someone refers to a "hard feathered" or "soft feathered" bird, it is a reference to the stiffness of the shaft of the feather. The Old English Game Bantam is considered a "hard feathered" breed, where the feathers are held tightly to the body. A Cochin would be a "soft feathered" breed, having a much looser, rounded appearance.

The last thing I will mention here is color pattern. There seems to be a great deal of confusion among them as some breeds may refer to one or the other with different names. For example, Penciling. In Cochins, the Partridge variety is penciled. Some descriptions in the SOP also refer to stippling, which appears as a very small pattern of dots on the surface of a feather, similar to what you see at the base of the feather labeled "Mottling." This brings up another point. In some varieties, a Mottled bird has solid white feathers interspersed with colored feathers, rather than just tipped in white as shown below. The feather shown below, in my opinion, is more indicative of a Mille Fleur type pattern, where the base of the feather is a shade of buff, red, or brown, with a black chevron edging a white tip.

The SOP also mentions “Shafting” for some varieties. This is simply where the feather shaft is one color and the body (vane) of the feather is another. This is required for some varieties, and considered a fault for others. Again the SOP is a handy resource for knowing what is required for the breed you are working with, to give you an idea of what you are looking for.

The last thing I will mention here is how to use the SOP. So many people get hung up on the feathers and colors of a bird, that the basis of what MAKES that breed can get lost. When you read the SOP, the breed description appears in order of importance. First is the overall shape, size or weight of the bird. Next would be the head, feet, wings and tail. These details include tail angulations, number of points on a comb, how tightly the wings are carried, and number and placement of toes (most breeds have 4 toes but some have 5). The last thing described in the Standard is coloration. 

(Click to enlarge images representing different feather patterns)


Hope this was helpful. If only one person gets anything out of it, then my time was well spent in typing this up. And remember, "It costs less to raise the best." A quote from my mentor and advisor, Dr. Bob Hawes from the University of Maine in Orono. I blame him for my love of poultry, and Cochins in particular. Thanks Dr Hawes.


Karen


*